Complete guide to nectar and pollen plants of Sabalan region with unique ecosystem analysis, flowering calendar and...
Queen Rearing through Artificial Insemination: Step-by-Step Guide
Instrumental Insemination of Honey Bee Queens: A Comprehensive Step-by-Step Guide
Queen Rearing Through Artificial Insemination is a scientific and advanced method in beekeeping that allows beekeepers to produce queens with desired genetic traits. This method provides complete control over the reproduction process, enabling the production of resilient and healthy queens for the colony. The natural mating behavior of honeybees presents a unique challenge for control. With the spread of pests and diseases, the population of these valuable species is at risk. Varroa mites and colony collapse disorder threaten pollinator populations globally, and with climate change and the scarcity of nectar and pollen in various regions, queen improvement and propagation are essential priorities for our biosphere. Queens are highly polyandrous and typically mate mid-flight with an average of 10 to 20 drones in congregating areas, which include 10,000 to 30,000 drones from diverse genetic sources. Artificial insemination is a fundamental tool that enables complete control over honeybee mating for research and breeding purposes.
In this guide, we first introduce the required equipment and then review the step-by-step procedure for performing artificial insemination. Lastly, we have provided a concise educational video from the University of Washington below the content. We hope that the prepared materials will be informative and useful for you.
Short History
To understand and appreciate the capability we have today, we must look back at a long history full of effort and innovation—a history that spans over 200 years of experimentation, doubt, and valuable discoveries. This winding path laid the foundation for our ability to control the mating of queen honeybees and drones.
Acknowledgment of the Past
To truly understand and appreciate the capability we have today, we must go back to a long history full of effort and innovation—a history spanning over 200 years of trials, doubts, and valuable discoveries. This winding path laid the foundation for our ability to control the mating of honey bee queens and drones.
From transparent glass boxes to various cages, from large greenhouses to smarter structures, all these were witness to relentless efforts to restrict natural mating. In the early 1900s, J.S. Davitt designed netted tents, claiming he could mate 500 queens daily within them. Several rewards were offered for discovering methods to restrict mating, but initial efforts did not achieve lasting success.
In 1922, Dr. Lloyd Watson introduced the first successful instrumental insemination technique. Using a manual syringe and securing the queen with silk thread on a wooden bed, he laid the foundation for an astounding method. At the time, this was performed without anesthesia, turning the queen into a resilient heroine, sacrificing for the continuity of her colony.
But the journey didn’t end there. Despite many unknowns about queen physiology and behavior, tireless researchers moved forward. In 1944, Dr. Harrold Laidlaw identified a valvefold that blocked the path of semen to the queen's ovaries, creating a new method of insemination.
A few years later, in 1947, Dr. Otto Mackensen designed the first instrument with an anesthesia chamber, using carbon dioxide to anesthetize the queen to stimulate her laying without causing harm. This invention not only made insemination safer and more effective but eventually became the cornerstone of modern instruments, enhanced with micromanipulators and advanced hooks.
The research of these scientists and hardworking beekeepers, like unsung heroes, allows us today to look back with pride and admiration. They planted the seeds of innovation and knowledge, and for every drop of nectar gained from bees, we raise our hands in respect and gratitude.
Advantages and Applications of Artificial Insemination
In addition to high reproduction speed, the artificial insemination technique allows for controlled mating of honey bees and enables the creation of hybrid breeds beyond what is naturally possible. These new breeds can be developed for genetic advancement, as well as for advancing research and breeding improvement efforts.
- A drone can mate with one or even several queens to isolate, enhance, and select for a specific trait that may not manifest due to the queen's natural mating with multiple drones.
- Semen from hundreds of drones can be combined to inseminate a group of queens, enhancing uniformity and the effective breeding population size to improve and maintain genetic reserves.
- Various degrees of inbreeding can be established, including "selfing": the mating of a virgin queen with her own male offspring.
- It enables the preservation of honey bee sperm. Sperm viability is maintained at room temperature for several weeks, making it suitable for scheduling insemination and transporting sperm.
Current Applications
The standard procedure for artificial insemination involves anesthetizing and immobilizing a queen bee, manually opening her sting chamber, and injecting collected sperm from a drone into her vaginal opening using a syringe. Besides mastering insemination techniques, the necessary steps for successfully performing artificial insemination in honey bees include:
- 1- Adherence to Breeding Principles: Applying breeding principles carefully to prevent the fixation of undesirable traits.
- 2- Understanding Honeybee Genetic Structure: Awareness of the unique genetic structure (haploid-diploid) of honeybees.
- 3- Selecting Appropriate Methods and Accurate Record-Keeping: Choosing practical insemination methods and maintaining precise records.
- 4- Access to Sufficient Genetic Diversity: Ensuring a large and genetically diverse population for breeding and preservation.
- 5- Provision of Resources and Committed Workforce: Providing necessary resources, workforce, and long-term commitment to the breeding program.
- 6- Colony Health and Hygiene: Managing colony health to prevent diseases and improve queen and drone quality.
- 7- Continuous Training and Skill Development: Ongoing skill enhancement for optimal results in insemination and breeding.
- 8- Adaptation to Environmental Conditions: Producing queens that are compatible with local climate conditions.
- 9- Goal Setting and Precise Planning: Establishing clear objectives for desirable traits like resilience and productivity.
- 10- Generation Evaluation and Improvement: Consistently evaluating and enhancing new generations to ensure improved results.
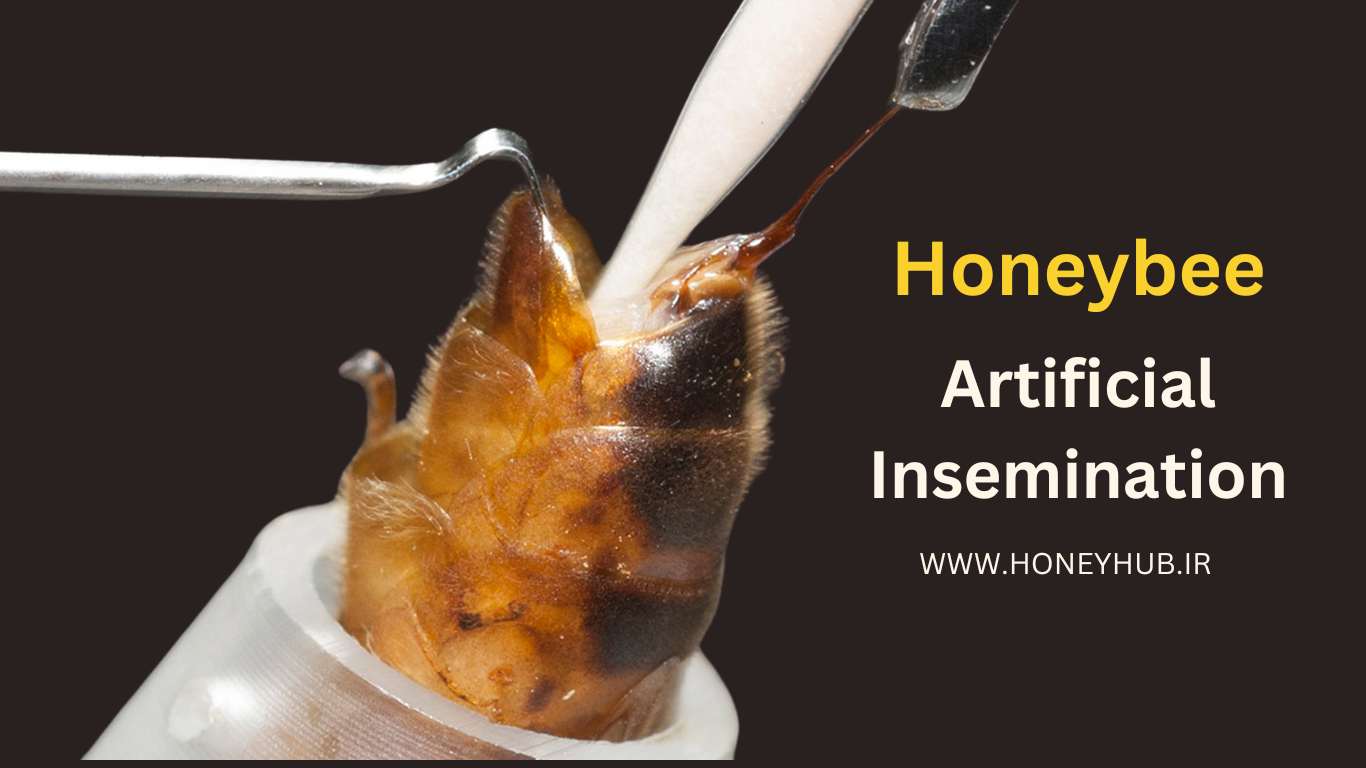
Equipment Required for Queen Bee Artificial Insemination
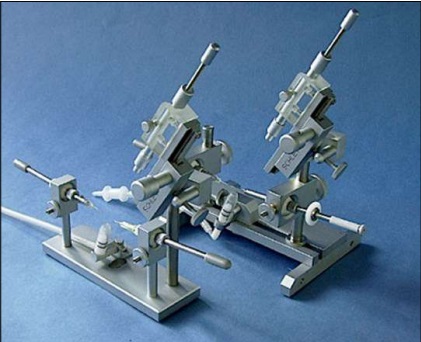
The basic technique of artificial insemination has not changed much since its development in the 1950s. Mastery of this technique requires practice, precision, and hygienic conditions. Specific beekeeping skills and proper care of queens and drones are essential for quality control. Several options for tools are currently available, providing a choice, but they may vary in quality and not meet the same standards. The main tools include a base, a set of hooks, a queen holder, a syringe, and a syringe tip. The microscope base must be compatible with the tools and provide sufficient depth of field and space for the equipment. The use of a cold light source is also recommended to prevent overheating and drying out. A source of carbon dioxide with a flow regulator and flexible tubing is also required for the tools.
Equipment requirements include:
1- Complete Insemination Kit: Includes tool base, controllers (manipulators), syringe, and accessories sourced from specialized beekeeping supply companies.
2- Stereoscopic Binocular Microscope: A microscope with 10x to 20x magnification and a cold light source, essential for precise observation of bee anatomy, especially during insemination.
3- Carbon Dioxide Source with Flow Regulator: Carbon dioxide is used to calm the queen and is connected to the system with flow regulators and tubes.
4- Saline Solution: Used for injection and washing tools, with preparation instructions provided in the relevant sections.
5- Sterile Vials: For storing sperm or necessary materials during the insemination process.
6- Pipettes and Syringes: For collecting sperm from drones and accurately transferring it to the queen insemination device.
7- Distilled Water: For washing and cleaning tools without adding additional contaminants.
8- 95% Ethanol: For disinfecting equipment and work surfaces to reduce contamination risks.
9- Sodium Hypochlorite: A substance for disinfecting surfaces and tools before and after insemination.
10- Sterile Towels and Cotton Swabs: For cleaning and disinfecting tools and work surfaces.
11- Pressurized Bottles: For using cleaning and disinfecting solutions.
12- Paper Towels or Kimwipe Towels: Towels for drying tools and work areas.
13- Autoclave or Pressure Cooker: For sterilizing equipment and ensuring the absence of pathogens.
14- Queen Cage: To keep the queen in safe conditions before and after insemination.
15- Cage for Keeping Drones and Flight Box: For keeping drones in appropriate conditions until used in the insemination process.
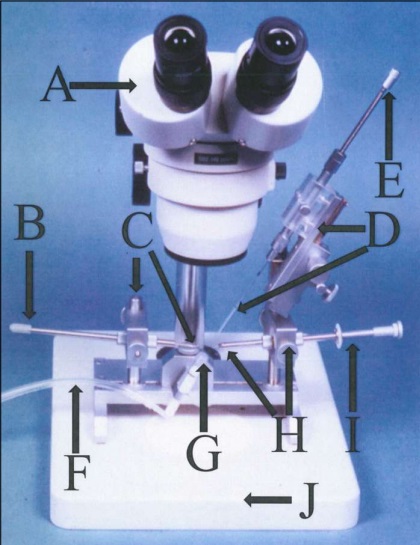
(A) Dissection microscope
(B) Handle for abdominal hook
(C) Base for abdominal hook (left arrow C) and abdominal hook (right arrow C)
(D) Syringe holder (upper arrow D) and syringe (lower arrow D)
(E) Syringe piston
(F) Plastic tube connected to CO2 source
(G) Chamber in which the queen is placed
(H) Sting hook (left arrow H) and sting hook base (right arrow H)
(I) Handle for sting hook
(J) Microscope base
Drone Holding Cages are constructed from a mesh material that prevents the queen from passing through, allowing worker bees to care for the drones within the breeding colonies. The size of these cages can vary, but they should be designed to fit within the space of a frame in the breeding colonies and be easily accommodated in a flight box. During the sperm collection process, drones are released into the flight box for easy access (Figure 4).
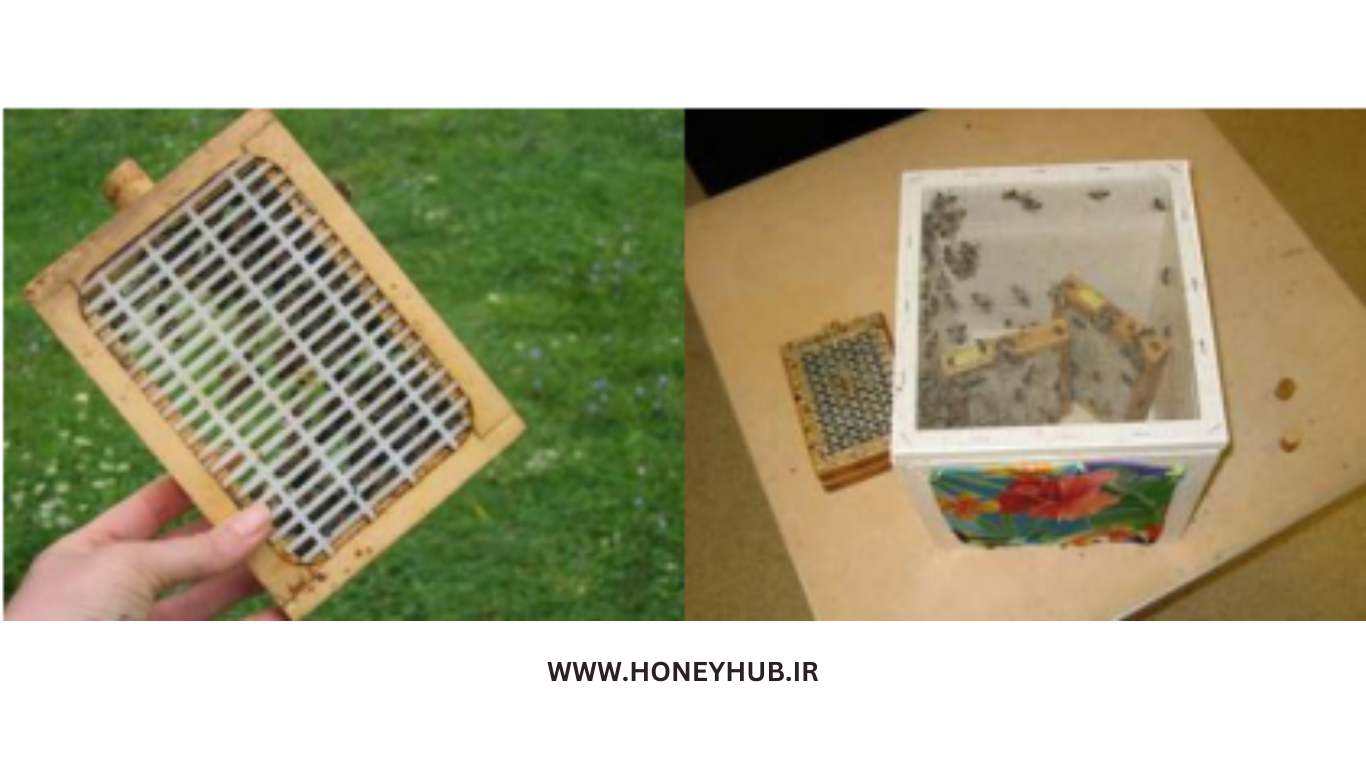
Drones are collected in cages made from materials that prevent the queen from entering (left photo). The cages should be designed to fit within the space of a frame in a nurse colony and also to be easily placed in a flight box (right photo: the holding cage is shown on the left side of the white flight box/display). Drones are released into the flight box for easy access during sperm collection.
2.1. Selecting the Right Tools
The quality, precision, and accuracy of the tools play a crucial role in facilitating and ensuring the repeatability of artificial insemination methods. Many of these tools are equipped with microcontrollers that enable precise movement and delicate adjustments. Various designs of stinger manipulation tools offer users personalized choices in techniques. Additionally, large-capacity syringes provide greater efficiency in sperm collection and effective methods for storing and shipping sperm. Therefore, selecting the appropriate tools can significantly enhance the quality of your work.
2.2. Salt Solution Formulas
Two salt solution formulas are recommended. The simple formula is suitable for insemination with fresh sperm that is collected and used on the same day. The second formula is used for storing and mixing sperm.
To prepare the solutions, use double-distilled water. First, add all the components to a volumetric flask, then add distilled water to reach the final volume. To sterilize the final product, use a bacteriological filter with a size of 0.2 micrometers. Only add amino acids and antibiotics after heating the solution. Adjust the final pH to 8.6, using sodium hydroxide (NaOH) to increase pH and hydrochloric acid (HCl) to decrease pH.
Simple Salt Solution Formula
The simple salt solution formula (Table 1) can be used for sperm collection and insemination on the same day. A very basic physiological solution is also suitable, consisting of 0.9% NaCl, 0.1% glucose, and an antibiotic.
Formula for Storing and Mixing Sperm
For mixing and storing sperm, the HHBSE salt formula (Tables 2 and 3) is recommended. This formula is suitable for preserving sperm at temperatures above the freezing point and in liquid nitrogen.
Since some required components (EDTA, glycine, and tylosin) are present in very low concentrations and measuring them with standard scales is difficult, it is necessary to prepare a 100X solution that can be added to the solution prepared in Table 2 to achieve the final product.
1. Add all the components listed in Table 2 (except for EDTA, glycine, and tylosin) to a volumetric flask and fill it with distilled water up to a final volume of 100 milliliters to create the base solution.
2. Prepare a 100X solution for the smaller components, namely EDTA, glycine, and tylosin (Table 3), and add this solution to the mixture from Table 2.
3. Using 10 milliliters of the base solution (Table 2), mix the components from Table 3 together. This will result in 10 milliliters of a 100X solution of these three components.
4. Then, add 0.9 milliliters of the 100X solution to the remaining 90 milliliters of the base solution.
5. Use bacteriological filters (size 0.2 micrometers) for sterilization.
Table 1. Simple Salt Formula
Add all the components to a volumetric flask and fill with distilled water to reach a final volume of 100 milliliters. Click on the green row to open the table.
| Component | Amount in grams per 100 milliliters of final volume |
|---|---|
| Dehydrostreptomycin | 0.25 |
| Glucose | 0.10 |
| L-Lysine | 0.01 |
| L-Arginine | 0.01 |
| L-Glutamic Acid | 0.01 |
| Tris HCl | 0.35 |
| Tris Base | 0.35 |
| NaCl (Sodium Chloride) | 1.1 |
Table 2. Recipe for the Base Solution for HHBSE Salt Solution for Sperm Storage and Mixing
First, add all the ingredients (except EDTA, glycine, and thioine) to a volumetric flask, then add distilled water to achieve a final volume of 100 milliliters.
In the second step, use 10 milliliters of this solution to prepare the solution in Table 3.
Then, add 0.9 milliliters of the solution obtained from Table 3 to the remaining 90 milliliters of the base solution (provided here) to create the final product.
Thioine, EDTA, and glycine constitute only a small portion of the final solution. Therefore, it is necessary to prepare a 100X solution of these substances to be added to the other listed ingredients. Click on the green row to view the table.
| Ingredients | Grams per 100 milliliters of final volume |
|---|---|
| Penicillin | 0.05 |
| Streptomycin | 0.044 |
| Kanamycin | 0.06 |
| Thioine* | 0.0032 |
| EDTA (Ultra Pure)* | 0.0002923 |
| TES (Acid) | 0.6879 |
| Tris (Base) | 0.3635 |
| Disodium Phosphate | 0.0142 |
| Sodium Citrate | 0.02942 |
| Arginine | 0.01 |
| Glycine* | 0.00075 |
| Proline | 0.05 |
| Catalase | 0.002 |
| BSA (Fat-Enriched) | 0.002 |
| KCl | 0.61131 |
| NaCl | 0.4847 |
| NaHCO3 | 0.042 |
Table 3. Recipe for a 100X Solution of Ingredients that Constitute a Small Part of the HHBSE Salt Solution (in Table 2)
Take 10 milliliters of the solution from Table 2 and mix it with the following ingredients. Then, add 0.9 milliliters of this solution to 90 milliliters of the base solution (specified in Table 2) to create the final HHBSE solution. Click on the green row to view the table.
| Ingredients | Grams per 10 milliliters of final volume |
|---|---|
| Thioine | 0.032 |
| EDTA (Ultra Pure) | 0.003 |
| Glycine | 0.0075 |
3. Techniques for Artificial Insemination
3.1. Everted Endophallus
Sperm is collected directly from adult drones, 14 days or older after emergence. For identification purposes, drones can be collected immediately after emergence (that is, collecting "fuzzy" drones that have just hatched in the hive) and kept in cages located in a bank colony (another colony of honey bees that will care for the drones). Mature drones can be collected the day before or the day of insemination with those returning from unsuccessful mating flights or collected from external frames within the colony.
To observe the sperm, the endophallus (urethra or part of the male drone's reproductive system) is easily everted by hand in two steps:
- a) Partial eversion
- b) Complete eversion
A very important consideration at this stage is maintaining sanitary conditions, as drones typically defecate during this process. Hold the drone so that the endophallus does not stick to the drone's body or your fingers, and have an alcohol-soaked towel ready for cleaning. Eversion of the endophallus is done within a few seconds.
The assessment of drone maturity and sperm quality should be conducted immediately; any drone whose urethra is not properly everted or does not yield sufficient sperm (~1 microliter) should be discarded.
Collecting sperm can be challenging, so proper techniques and practices will significantly enhance efficiency. Plan to have a large number of mature drones, more than you need, as not all of them will yield sperm. Keep the drones warm and well-fed until they are used. The light above the flight box provides warmth, and sweetness or a piece of honeycomb stimulates their activity.
Process of Eversion of the Drone
- Collect and prepare the syringe:
- All components must be sterilized, either by heat or by washing with alcohol and then rinsing with distilled water.
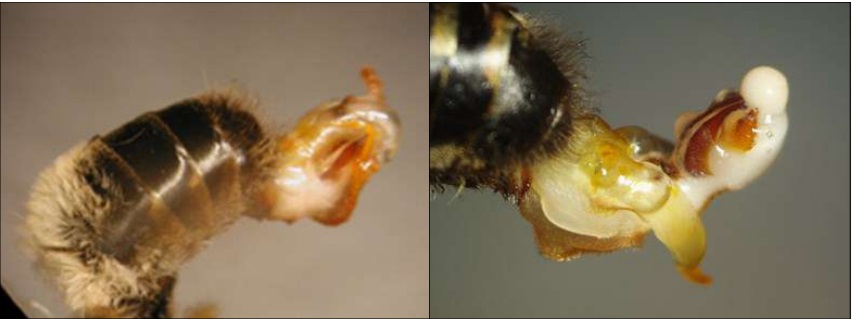
- To achieve partial eversion: Hold the head and thorax of the drone between the thumb and index finger in a ventro-dorsal position, so that the abdomen is facing up. If the individual is right-handed, it is helpful to hold the head of the drone with the right hand and apply pressure to the abdomen with the left hand to keep the drone in a suitable position for sperm collection.
- Roll or crush the thorax between your fingers:
- If the drone is mature, the abdomen will contract, revealing a pair of yellow-orange cornua (Figure 5).
- If the abdomen remains soft or the cornua has no color, the drone is immature and will not provide sperm (Figure 6).
- To achieve complete eversion: Grasp the base of the abdomen near the thorax with the thumb and index finger and apply pressure on both sides of the abdomen, starting from the anterior base and moving towards the posterior tip.
- Continuously push your fingers forward and roll until complete eversion is achieved.
3.2. Sperm Collection
Sperm is directly collected from the endophallus of many drones into a syringe and stored in capillary glass tubes. The quantity and consistency of the sperm obtained from each drone can vary and depend on skill and experience. Generally, each drone produces about 1 microliter of sperm. The standard volume of sperm for inseminating a queen is approximately 8 to 12 microliters. Maintaining hygienic conditions is essential, as drones often defecate during pre-collection. It is recommended to have a paper towel on hand to clean the drone's feces. Although less common, queens may also defecate during this process. In such cases, the queen should be discarded.
Sperm Collection Procedure
- After assembling the syringe, draw an air space (about 5 microliters) to separate the saline solution column from the sperm in the syringe. Then, add a small drop of saline solution (about 2 microliters) to the tip of the collection tube. This will be the last fluid injected into the last inseminated queen, helping to flush away any residual sperm that may have stuck to the walls of the capillary.
- Draw another air space and collect a small drop (0.5 microliters) of saline solution at the tip of the syringe. Use this drop of saline to contact the sperm in the endophallus of the first drone.
- Collect the sperm from the layer of viscous liquid and draw it into the syringe.
- Avoid collecting the viscous liquid completely. If you feel any resistance, pull back or remove any viscous liquid at the tip of the syringe. Excess viscous liquid at the tip of the syringe can cause it to clog.
- Repeat step 3 until the desired amount of sperm is collected.
- Touch a small drop of sperm from the tip of the syringe to the sperm load of the next drone and draw the sperm into the syringe.
- Avoid collecting air bubbles and excess saline in your sperm column. The sperm column should be uniform in color and density.
- Between sperm loads, keep the tip of the syringe moist to prevent it from drying out and be careful not to overly dilute the sperm. Drone sperm dries quickly and dies when exposed to air.

Draw an air space to separate the saline solution column from the sperm in the syringe. After the air bubble, collect a small drop of saline solution at the tip of the syringe to contact the sperm present on the endophallus of the first drone.
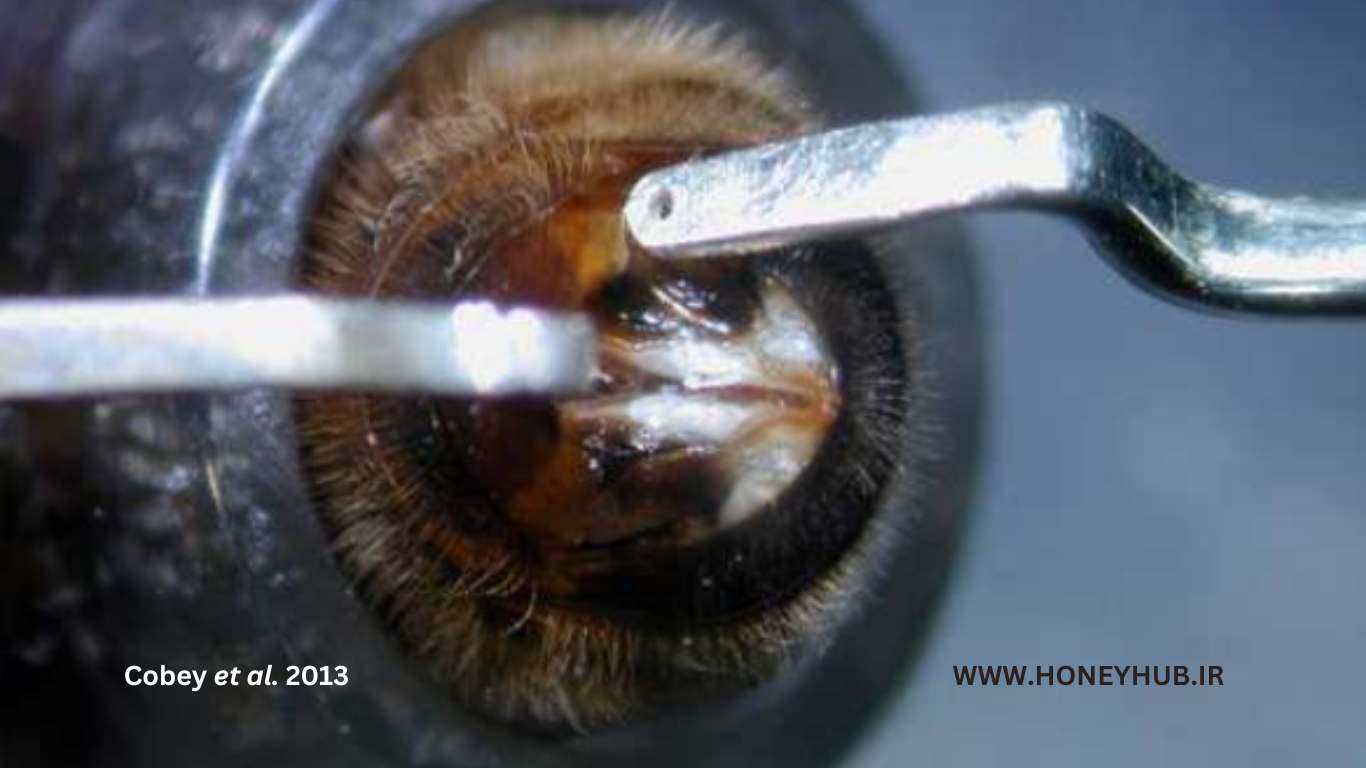
The abdominal hook is on the left, while the perforated sting hook (which is visible with a small hole for placing the sting) is on the right.
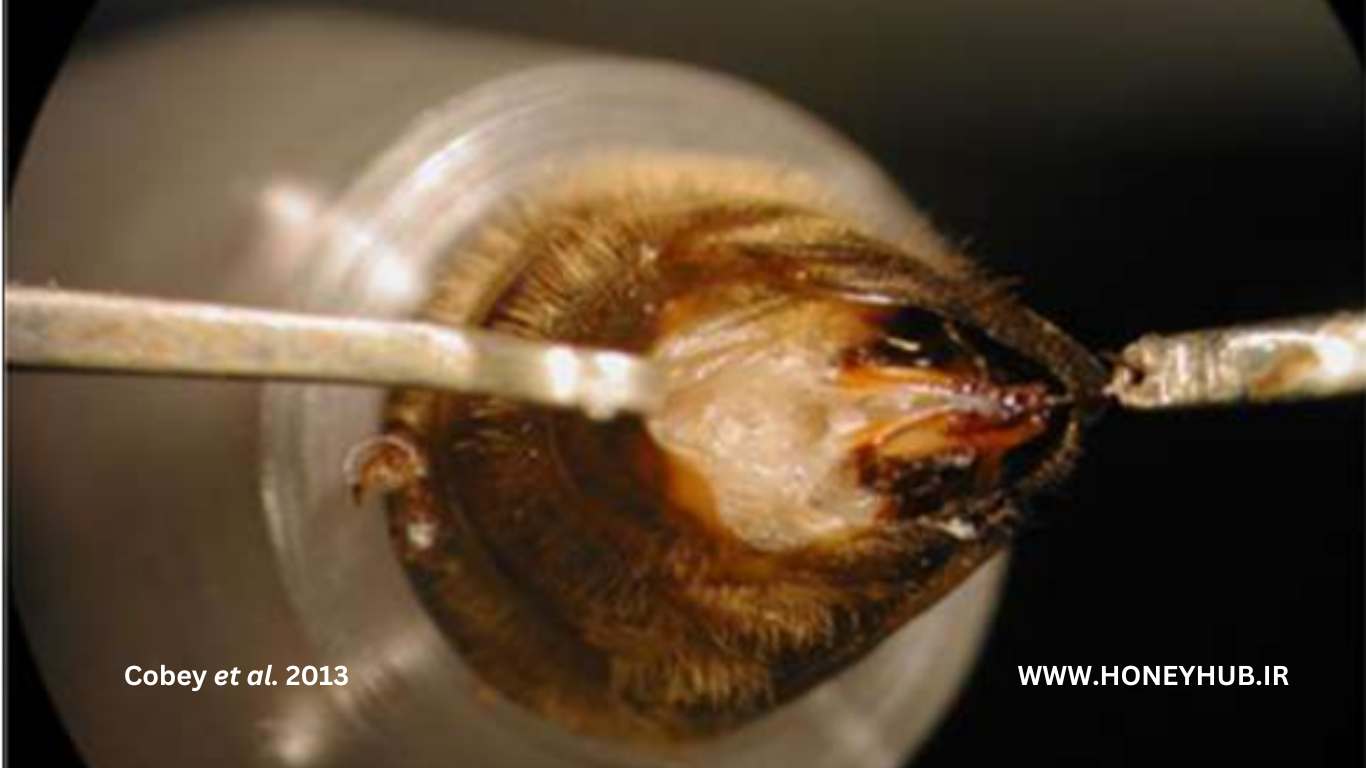
Figure 8: Passing the sting through the perforated sting hook (on the right). The abdominal hook is on the left and is used only to hold the queen in place.
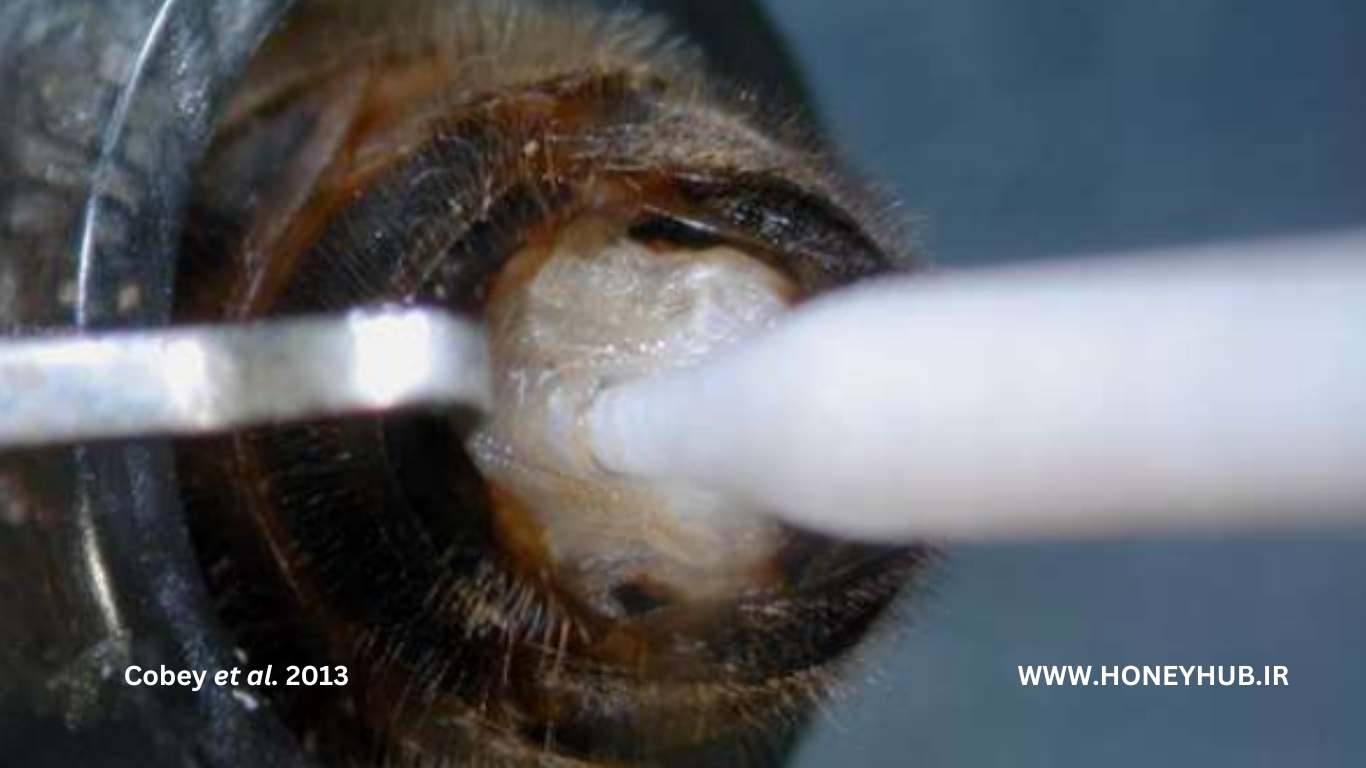
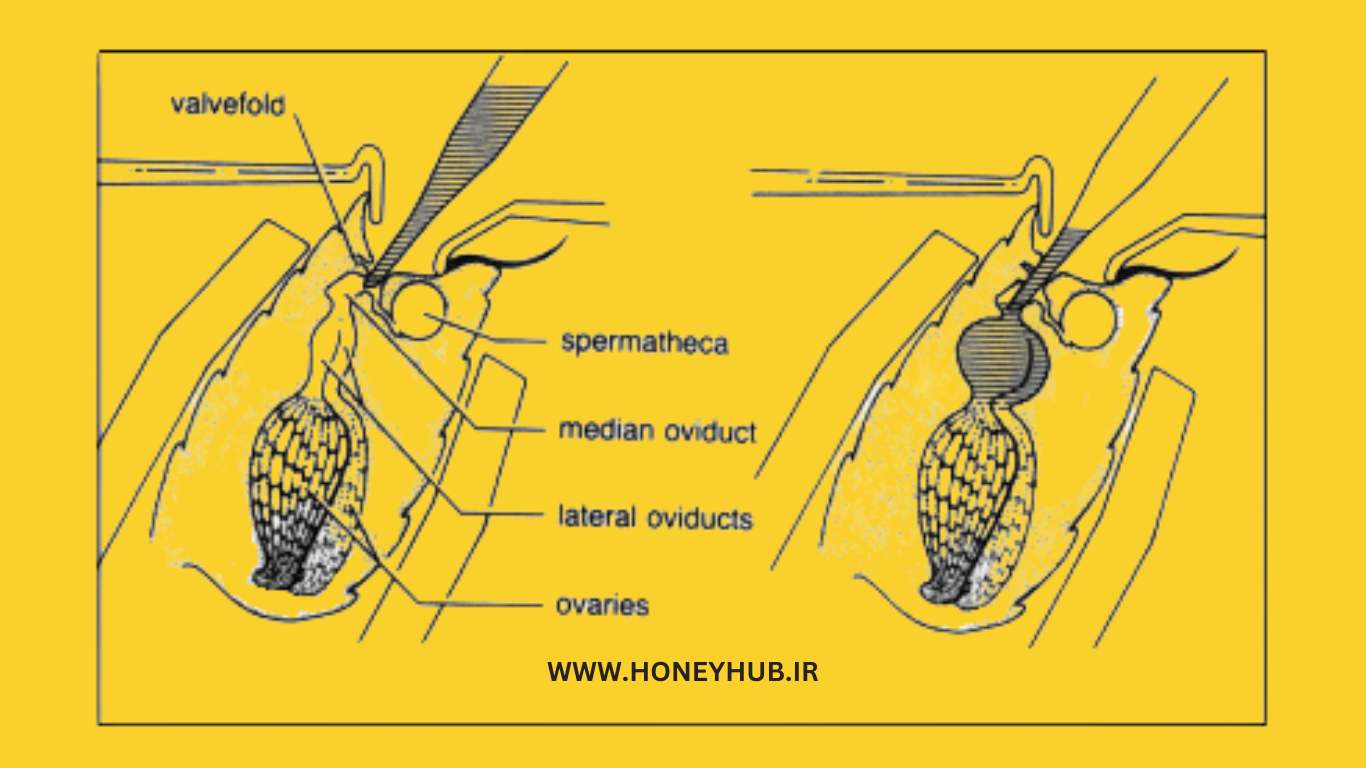
Figure 9: Inserting the sperm into the middle oviduct. When positioned correctly, the tip of the syringe easily passes through the edge of the valve without any resistance.
3.3. Queen Insemination
Queens should be inseminated between 5 to 12 days after emerging from their larvae. During this process, carbon dioxide is used to anesthetize the queen, which also helps stimulate egg-laying. Queens can be placed in a queenless bank or, preferably, in their colonies (which are usually small hives with a few hundred adult worker bees and a virgin queen called mating nuclei). If mating nuclei are used, the queen cells should be placed in a cage (so that the queens are released from the cage) or ensure that the hive entrances are covered with materials that prevent the queen from mating to avoid unwanted natural mating flights.
Queen Insemination Procedure
1. Usually, two CO2 treatments are required. The first CO2 treatment involves a 1 to 4-minute exposure one or two days prior to the insemination process. The dose can be administered by individually caging the queens and placing them in a jar or plastic bag filled with CO2. The second treatment is administered during the process.
2. Adjust the syringe and queen holder on the tool base at an angle between 30 to 45 degrees (depending on the tool being used) to facilitate passing through the turn valve.
3. Position the queen in the holding tube belly down and face down, ensuring that her abdomen protrudes several sections and providing a slow, steady flow of CO2 to her.
4. Separate the abdominal plates to reveal the vaginal canal using a pair of hooks or tweezers.
5. Lift the sting structure upwards to make the vaginal cavity visible.
- During this manipulation, use the abdominal hook only to stabilize the queen in place.
6. Position the syringe tip horizontally above the "V" that defines the vaginal canal. Insert the tip 0.5 to 1.0 millimeters into the vaginal canal, slightly ahead of the tip of the "V".
7. Further insert the tip 0.5 to 1.0 millimeters into the canal while using the tip to lift the turn valve downwards. Use light "zigzag" movements to pass through the turn valve.
- The turn valve, a retractable edge of tissue that covers the mid canal, must be bypassed or sperm will leak from the vaginal canal.
- If positioned correctly, the tip should easily pass through the turn valve without resistance.
- As explained in section 3.2, it is beneficial to leave a small air bubble between the saline solution and the sperm and to release some saline for lubrication before inserting the tip into the queen.
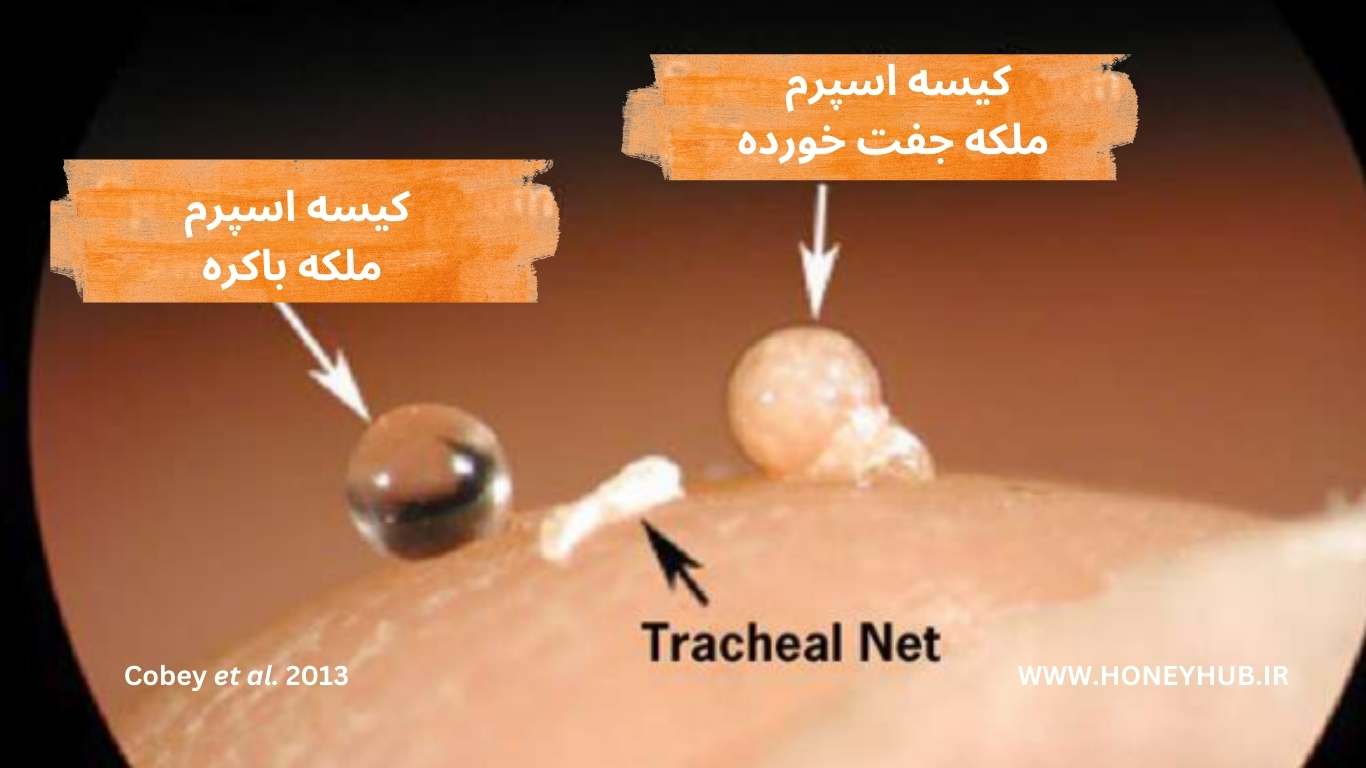
Figure 11. Comparison of the sperm sacs of a virgin queen (clear) and a mated queen (brown with a marbled swirl pattern).
8. Inject a specified amount of sperm directly into the median oviduct (Figure 19).
- The standard dose is 8 to 12 microliters per queen. When administering a 12-microliter sperm dose, release the queen directly into her mating nucleus colony to assist with sperm migration, or administer two doses of 6 microliters 48 hours apart.
- With practice, sperm injection is performed quickly and accurately, taking only a few seconds per queen.
9. After insemination, remove the syringe tip, collect a small air bubble and a small drop of saline solution (~0.5 microliters) to use before the next insemination.
- Keep a drop of saline at the tip to prevent any remaining sperm from drying and to facilitate the start of the next sperm collection.
- If inseminating queens with different drones and precise genetic crosses are important, wash the insemination tip with distilled water and then saline solution to fully clear the syringe of sperm from the previous drone.
10. Release the queen from the holder, place her in a cage, and return her to her nucleus colony.
3.4. Dissection of the Sperm Sac Area Examining the sperm sac to determine the success rate of insemination is helpful in learning the insemination process. Sperm migration requires about 40 hours after insemination. After insemination, a group of queens can be kept in a rearing colony for testing.
Sperm Sac Dissection Process
1. Restrain the queen by pressing on her head and thorax.
2. Grasp the end of the queen's abdominal segments from above and below.
3. Detach the segments from the rest of the queen’s body using your nail or forceps.
- The sperm sac is a white, spherical structure about 1 mm in diameter, appearing rough due to the covering of a tracheal network.
- 4. Extract the sperm sac from the body cavity using your nail or forceps.
- 5. To remove the tracheal network, gently roll the sperm sac between your fingers. The network will form a small white mass.
- The shade and density of the sperm sac indicate the relative success of the queen’s insemination.
- The sperm sac of a virgin queen is clear.
- An opaque or milky appearance of the sperm sac indicates inadequate insemination or queen infertility.
- For a fully inseminated queen, the sperm sac has a cream color with a marbled swirl pattern.
4. Queen and Drone Maintenance and Factors Affecting Queen Performance
With proper care, artificially inseminated queens are capable of leading productive colonies and withstanding the rigors of field performance testing. Many factors affecting queen performance can be optimized through appropriate beekeeping management practices. Insemination quality, both in terms of technique and hygiene, is crucial. The treatment of queens before and after insemination will affect sperm storage and queen performance. Natural conditions should be maintained as much as possible. We will cover this topic in another post. Click here to read the post “Queen and Drone Maintenance After Artificial Insemination and Factors Influencing Queen Performance.”
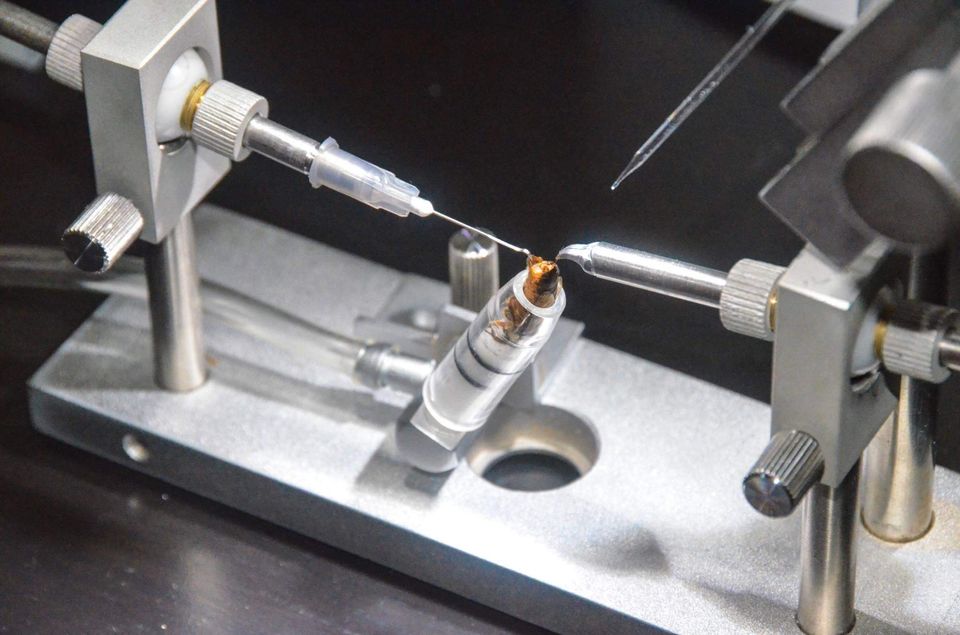
Educational video on honey bee instrumental insemination by Susan Cobey.
References
Key Points and Precautions
- Equipment Sterilization: Before beginning any stage, ensure all equipment is thoroughly sterilized. Contaminated tools can lead to infection and even the queen’s death.
- Focus and Calmness: During the insemination process, maintaining focus and calmness is essential. The queen is highly sensitive, and any extra pressure or abrupt movement can be harmful to her.
- Temperature and Light Management: Using cool lighting allows for clear visibility of organs without producing excess heat, helping to prevent harm to the queen.
Conclusion
Instrumental insemination in honey bee queen rearing is a precise and effective technique that, with some practice and care, can provide excellent results in genetic quality control of colonies. By utilizing this method, beekeepers can cultivate resilient, healthy, and high-yield colonies with longer lifespans and reduced special care needs.
If you have any questions or suggestions, feel free to share them in the comments below.

Leave a comment
Log in to post comments
Comments
در زمان تکثیر مصنوعی بهترین کار کدام است؟
By: محمود بستان بان On 2025-04-06Rating:★★★★★ (5.0)سلام خداقوت من می خواهم ملکه تولید کنم بهترین روش و بهترین کار چیه من می خواهم کار را شروع کنم
Replied by: Somayyeh Amini On 2025-04-07
درود کاربر گرامی
پاسخ به سوال شما از چند دیدگاه قابل بررسی است ولی به طور خلاصه موارد زیر را می توان انجام داد
بهترین کار برای تکثیر مصنوعی ملکه زنبور عسل:
انتخاب کلنی قوی و سالم به عنوان منبع لارو.
پیوند لاروهای جوان (کمتر از ۲۴ ساعت) به فنجانهای ملکه.
استفاده از کندوی پرستار بدون ملکه برای تغذیه لاروها با ژله رویال.
کنترل دما (۳۴-۳۵°C) و رطوبت (۶۰-۷۰%) در کندو.
زمانبندی مناسب (فصل بهار یا اوایل تابستان).
بررسی سلولهای ملکه پس از ۱۰-۱۲ روز و معرفی آنها به کندوهای نیازمند.
رعایت این نکات، شانس موفقیت در پرورش ملکه را افزایش میدهد.
Related posts
 Honey Hub, a treasure trove of nature's amazing products
 Why does pollen improve your health?














Latest comments